Showing posts with label tips and tricks. Show all posts

Saturday, April 27, 2013

How To View Two Excel Sheets Side-By-Side

1 comment
Excels are the best way to maintain your records like count or any important task. In my work we always work on excels to maintain my records i.e how many games we tested etc. Similarly, like we tested around 100+ games, we have to make a correct count of each game. This not only includes correct count, but also the count of defects we logged and against which games and all. This becomes necessary to compare the data with different sheets. For this the best option is to open two different sheets side by side. But it becomes very troubling to maintain both the sheets.


 There in Office 2013, we have this feature in which you can view two different excel sheets side by side. Not all MS office provides this feature, but Office 2013 does.

Follow the steps below to view two excel sheets side by side
:

  •  Open the two sheets that you want to say, compare or view.
  •   Select any of the sheet and click on the View -> Arrange All.
  •   Then you will see a small window, select the option Tiled.
Note: You can also view them in horizontal manner. For that you need to select the Horizontal option
  •   You can also choose the option View Side By Side, if your choice is horizontal.
  •   If you choose the View Side By Side option, below it you will find the option, Synchronous Scrolling. Click on it, if you want to sync the scrolling.

This way you can compare any two excel sheets or view two different excel sheets side-by-side.
Note: Make sure that your files are saved.
Read More...

Sunday, April 7, 2013

Watch 18+ Videos On Youtube Without Signing In

Leave a Comment

Watch 18+ Videos On Youtube Without Signing In

Sometime its annoying when youtube ask you to sign in for your age verification to watch 18+ videos. So i will make it easy for you by showing you a simple youtube trick to watch adult or 18+ youtube videos without signing In. This trick is 100% working as of 2013. So lets get started.

How To Watch 18+ Youtube Videos Without Logging In ?

1. First get the Url of video you want to watch. As shown below. 
  • http://www.youtube.com/watch?v=4Xkh6j7RMqk 
2. Then copy the Video Id. For above link video Id is 4Xkh6j7RMqk
 
3. Now paste the Video Id in the link given below.
 
  • http://www.youtube.com/v/VideoId?fs=1
  • Replace VideoId with the Id you copied in Step 2
4. Now the url will become as shown below. 
  • http://www.youtube.com/v/4Xkh6j7RMqk?fs=1 
5. Done.

You May Also Like:
Read More...

Tuesday, March 19, 2013

Improving PC Performance with Readyboost? How Is This Possible?

Leave a Comment
ReadyBoost was first introduced in Windows Vista in 2006 and is still included in Windows 7 and Windows 8. ReadyBoost works in a similar way to Superfecth. Superfecth works by monitoring and then automatically loading the data or program used in the computer into RAM so that the program becomes faster when run. ReadyBoost, on the other hand, does not use RAM but uses a USB flash drive (or other flash based memory) instead.
 
Can ReadyBoost really improve the performance of your PC?

In theory it would be faster for a computer to read small data from flash drive than it does from hard drive, but unfortunately the reading speed of flash drive is much slower than that of RAM; therefore, if the capacity of RAM in your computer is sufficiently large---say, more than 1GB, adding flash drive for ReadyBoost would give very little effect and even the performance improvement produced may not be perceived at all because Superfetch has done effectively to foster such improvement. In contrast, if your computer only has a small amount of RAM (512MB for example), then the addition of 1GB or more flash drive memory for ReadyBoost would be very influential, although the increase was not as high as the performance obtained from the addition of RAM with the same amount.

 The recommended amount of memory to use for Windows ReadyBoost acceleration is one to three times the amount of random access memory (RAM) installed in your computer. For instance, if your computer has 512 megabytes (MB) of RAM and you plug in a 4 gigabyte (GB) USB flash drive, setting aside from 512 MB to 1.5 GB of that drive will offer the best performance boost. The minimum size for any USB flash drive to work with Windows ReadyBoost is 256 MB. (Microsoft)


When should we use ReadyBoost?
As I said before, the improvement of PC performance with ReadyBoost will only be perceived if the capacity of RAM in your computer is small (1GB or less); but you are too lazy to add RAM, ReadyBoost will be very useful. Please note that if you use ReadyBoost, it is better for you to use a high-speed flash drive so the performance improvement produced can really be perceived.

If your computer is slow because its RAM is small, do not be too lazy to buy additional RAM and to improve its capacity. ReadyBoost is only viable under a particular circumstance or if you have a high speed flash that you don’t use. Is your computer running out of available RAM slots? Then replace your RAM with one with larger capacity. Has the maximum capacity of your computer’s RAM been reached? Then upgrade your computer's hard drive with an SSD; your computer's performance will certainly be much better.
Read More...

How To Automatically Clear History & private Data When You Close Your Browser

Leave a Comment
How to Automatically Clear History and Private Data When You Close Your Browser
Sometimes, for some reason you wish that other people do not know the history of your browser. You can set up your browser to automatically clear your history when you close the browser window.

Actually there are "private mode" in Firefox and "Incognito" in Chrome, the feature that makes the browser does not save any history after you close the browser, but we cannot control what kind of history you want to delete. Do not worry, Here is how to make the browser automatically delete the history on some of the famous browsers, but still we can customize what kind of history you want to delete
:

Firefox

  • Click Firefox > Options
 

  • Click Privacy > then select "Use custom settings for history" 
  •  Enable "Clear history when Firefox closes" > and then click Settings...
  • Select the types of history and data to be automatically deleted > then click OK

 Internet Explorer

  •  Click gear icon > select Internet Options
  • Enable "Delete browsing history on exit" > then click Delete...
  • Customize which types of history Internet Explorer will clear > then click Delete


    Opera

    Different from Firefox and IE, opera does not have special features that can automatically remove all types of history data. However, you can make opera to erase cookies, cache data and browsing history. Follow the steps below:
    •  Click Opera > Settings > Preferences

    • Click Advanced > History > check on "Empty on exit"
  • Click Cookies > check on "Delete new cookies when exiting Opera" > Click OK

Google Chrome

Like opera, chrome has no special features to delete all history data automatically when the browser window is closed, but you can still automatically delete cookies when the browser window is closed ... and if you want to delete all history data, install extension called Click&Clean. Follow these steps to set up chrome to automatically delete cookies when the window is closed :
  • Open Chrome menu > click Settings
  • Click "Show advanced settings"
  •  Click Content Settings...
  •  select "Keep local data only until I quit my browser" > then click OK

Follow these steps to set up chrome to automatically delete all history data when the window is closed using Click&Clean extension:

  • Instal Click&Clean extension > open menu > click Options


  • Scroll down and then check on "Delete private data when Chrome closes". You can customize which types of history data will be automatically deleted on the same window. 
Read More...

Saturday, March 16, 2013

Enable Task Manager disabled by Administrator or Virus in Windows

Leave a Comment
Windows Task Manager is used to view details about processes running on your computer. Since it can be used to terminate programs that are misbehaving or are viruses disguised in the form of harmless programs, most spyware and viruses disable it to prevent themselves from being closed through it. Some administrators also disable Task Manager to prevent users from closing important security programs like antiviruses and anti-malwares.

In such situations, running the Task Manager will give the "Task Manager has been disabled by Administrator" error. However, there are some techniques you can use to re-enable task manager and close those harmful programs manually. This article contains few such simple techniques you can use to regain access to Task Managing privileges.


enable task manager disabled by administrator

Enable Task Manager from Registry in Windows 8, 7, XP or Vista

Registry Editor is an inbuilt Windows tool that is used to modify registry keys which tell Windows how it should work. A simple registry modification can be used to bypass the Task Manager block. To do so, just follow the steps:-
  1. Click on Start. Go to Run. If you use Windows 8, Windows 7 or Windows Vista, go to Search.
  2. Type regedit and press Enter. Registry Editor will start. If Registry Editor is also disabled, you will first need to enable registry editing.
  3. Through the left hand navigation pane, navigate to HKEY_CURRENT_USER\Software\Microsoft\ Windows\ Current Version\Policies\System. If the System key is not there, you will need to create it.
  4. In the work area, locate "DisableTaskMgr". If this value is not there, you will need to create a new DWORD value called DisableTaskMgr. Double click on it. A window will pop up.
  5. Enter its value data as 0 and press OK.
  6. Close Registry Editor. If Task Manager is still disabled, restart your computer.

Enable Task Manager from Group Policy Editor (Gpedit.msc)

enable task manager
Windows Task Manager in Windows 7
Group Policy Editor is a feature in Windows which is used to edit local policy settings. It can also be used to enable Task Manager. To do so, just follow the steps given below:-
  1. Open Start Menu. Windows XP users click on Run. Windows 8, Windows 7 and Vista users, go to Search.
  2. Type gpedit.msc and press Enter. Group Policy Editor Window will show up.
  3. From the navigational pane at the left hand side, go to: User Configuration>Administrative Templates>System>Ctrl+Alt+Del Options.
  4. In the work area, double click on "Remove Task Manager" and set its value to Disabled or Not Configured.
  5. Restart your Computer or Log Off and Log back On to apply the changes.
Group Policy Editor is not available on home editions of Windows.

Enable Task Manager by Running a CMD Command

Command Prompt can also be used to directly enable Task Manager.
  1. Open Notepad.
  2. Copy the code given below and paste it.
  3. REG add HKCU\Software\Microsoft\Windows\CurrentVersion\Policies\System  /v  DisableTaskMgr  /t REG_DWORD  /d /0 /f
  4. Save the File as TaskManager.bat.
  5. Run TaskManager.bat as Administrator if you use Windows 8, Windows 7 or Windows Vista. In Windows XP, simply open the file. A command prompt window will flash for a second and then disappear indicating successful execution. After running the batch file, you will be able to again use Task Manager. If Task Manager is still not available, restart your computer.

Create a Registry(.reg) file for enabling Task Manager

If you are unfamiliar with manually editing the Registry, you can create a Registry file which will automatically modify the Registry Key to re-enable Task Managing. To create one such file:-
  1. Open Notepad or any other text editor.
  2. Copy the code given below and paste it as it is in it.
  3. Windows Registry Editor Version 5.00 [HKEY_CURRENT_USER\Software\Microsoft\Windows\CurrentVersion\Policies\System] “DisableTaskMgr” =dword:00000000
  4. Save the file as Enable Task Manager.reg or *.reg.
  5. Open the file by double clicking on it.
  6. Registry Editor will ask you for confirmation. In the confirmation Window, click Yes.
  7. Task Manager would immediately be accessible. If it is not, restart your computer.
The techniques mentioned in this article work on Windows 8, Windows 7, Windows XP and Windows Vista
Read More...

Friday, March 15, 2013

Convert a Web Page into PDF File Format Online

Leave a Comment
PDF format is one of the easiest and handy way to store and view any documents. Commonly most of the websites do not allow to download their page into pdf format. You can do this conversion with the help of some software or converter. But if you perform the conversion online then why will you try a third party application? We’ve found out a secured and easy to use online web application Web2PDFconvert which can convert any web page to PDF file format successfully.

[Similar article: Google Docs as a Batch PDF Converter.]

Web2PDFconvert is a free on line web tool where you can easily convert any web page into pdf file with a single click. Then you can read your converted web page with any pdf reader like Adobe Reader, Foxit reader and other such tools which can read the pdf formatted files. Web2PDFconvert is user friendly and easy to use. It does not require any registration and sign up process.

How To Use

  • Go to Web2PDFconvert and put the web page url which one you want to convert. Click on “Convert to PDF” button“.
 
  • To customize your pdf file click on “option“. Here you can set the Image Compression Level, Page Size, Margins etc. even you can set password of your converted pdf file.
  • After successfully converting your web page, you will get three option- “Download PDF File“, View in Google Docs” and “Store and share PDF Online“. Do click on the link which one you like.

Key Features

  • Web2PDFconvert offer browser extension for Internet Explorer, Mozilla Firefox and Google Chrome. With these extensions you can convert any web page into PDF file directly from your browser toolbar.
  • You can add PDF Bookmarklet on your browser to convert any web page into pdf with a single click. Bookmarklets are available for Internet Explorer, Mozilla Firefox, Google Chrome, Safari and Opera.
  • One of the most interesting feature is PDF by E-mail. Here you can send the url to submit@web2pdfconvert.com and get back the reply with a pdf file of the corresponding url.
  • You can add a PDF Button on your web site or blog for your visitor so that they can easily save your web site’s pages as pdf form with a simple click.
  • It also provides three more useful conversion like Word to PDF, PDF to Word and PDF to Excel.
Read More...

Google Docs as a Batch PDF Converter

Leave a Comment
There are many software that allows you to batch convert the word documents, Excel Spreadsheet and PowerPoint Presentation  in PDF format at once. But many of them are not free of cost and you’ll have to spent some bulks. If you want to batch convert the huge bundle of office documents in PDF format without investing in the commercial software like Adobe Acrobat then Google Docs sounds great.

Not only Google Docs has the ability to convert the office documents in PDF format but also it has been added with a new export feature recently,which makes it  easier to batch convert Microsoft Office and OpenOffice files into PDF file format.

How to batch convert into PDF with Google Docs

  1. Create a New Folder in Google Docs and name it as your choice.Here I’ll use the folder name as Softslas.Write a description so that you can identify that in the numbers of folders.This folder will be used to upload all the office or image files which have to be converted.convert-office-documents-in-PDF-format
  2. Now select the Upload button in your left hand side in Google Docs and select the files which are to be converted  from your source by the Select files option and set the destination folder that you have created earlier,here it is Softslas.Now click on Start Upload button.You can select a huge amount of office or image documents.Google docs will batch convert them.convert-office-documents-in-PDF-format-2
  3. Though Google Docs officially supports the .ppt, .pps, .doc, .docx, .odt(openoffice) and .sxw(StarOffice ),csv, .xls, .xlsx and .ods(OpenDocument Spreadsheet) file format you can also upload an image file to convert in the PDF file.
  4. After uploading all the files you have chosen in Google Docs go back to the Google Docs dashboard and select the Folder named Softslas and select the all files in that folder.Now select the Export option under More actions.
  5. Now chose the PDF file format from the drop down list and then click on Continue.Now all your Office document will be instantly converted in PDF format.convert-office-documents-in-PDF-format-3
If your document are so huge then you don’t have to wait in the browser to finish the conversion in PDF.Google docs will bach convert them.Google Doc will automatically finish it and will send you an email with a link of directly downloadable location once the process has been completed.
Is it not a great way to batch convert your office documents?Please let us know.Put your valuable comments in the comment section.
Check out also Adobe PDF Guide and Google Docs Guide for more tips and tricks.
Read More...

Make your Computer Welcome You

Leave a Comment
Do you watch movies? Have you always loved the way how Computers in movies welcome their users by calling out their names? I bet that you too would want to know how you can achieve similar results on your PC and have a computer said welcome.

Then you are at the right place, this article describes exactly how you can make your computer welcome you like this.

With this trick, you can make your Computer welcome you in its computerized voice. You can make your Windows based computer say "Welcome to your PC, Username."

Make Windows Greet you with a Custom Voice Message at Startup

To use this trick, follow the instructions given below:-

  1. Click on Start. Navigate to All Programs, Accessories and Notepad.
  2. Copy and paste the exact code given below.
Dim speaks, speech
speaks="Welcome to your PC, Username"
Set speech=CreateObject("sapi.spvoice")
speech.Speak speaks
     3.  Replace Username with your own name.
     4.  Click on File Menu, Save As, select All Types in Save as Type option, and save the file as Welcome.vbs or "*.vbs".
     5.  Copy the saved file.
     6.  Navigate to C:\Documents and Settings\All Users\Start Menu\Programs\Startup (in Windows XP) and to C:\Users\ {User-Name}\AppData\Roaming\Microsoft\Windows\Start Menu\Programs\Startup (in Windows 8, Windows 7 and Windows Vista) if C: is your System drive. AppData is a hidden folder. So, you will need to select showing hidden folders in Folder options to locate it.
     7.  Paste the file.


 Make your Computer Welcome you at startup

Now when the next time you start your computer, Windows will welcome you in its own computerized voice.

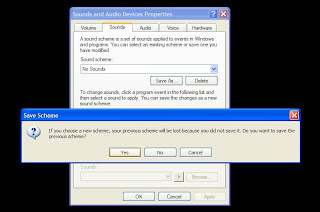
Note: For best results, it is recommended to change sound scheme to No Sounds.
You can change the sound scheme to No Sounds by following the steps given below:-
  1. Go to Control Panel.
  2. Then click on Switch to Classic View.
  3. Then Click on Sounds and Audio Devices.
  4. Then Click on the Sounds Tab.
  5. Select No Sounds from the Sound Scheme option.
  6. If you wish to save your Previous Sound Scheme, you can save it by clicking Yes in the popup menu.
  7. Click on OK.
Change Sound Scheme to No Sounds

Try it yourself to see how it works. In my personal opinion, this is an excellent trick. Whenever I start my PC in front of anybody and the PC welcomes me, the fellow is left wondering how brilliant a computer do I have.
Read More...

How To Access Facebook When it is Blocked in School College Or Office

1 comment
Did you try to access Facebook when blocked in school, college or office? In most case, you are blocked when you try to get access of them, mainly the social networking sites. Most of the organizations block social networking websites. They want to prevent people from getting access to Facebook, Orkut where people spent a lot of time. If you are addicted in Facebook or Orkut like me then you must have tried some methods to get on Facebook when it is blocked at school, college or office. Here are some quick guides to access the blocked websites. Here, I’ll describe how to open Facebook when it is blocked.

Let me describe how the administrator of the network system blocks the Facebook, Orkut or any other sites? The URLs of the website, you generally type in the address bar are originally an IP address. Every website has a unique IP*. So, when you browse any website typing the website URL, computer matches the URL name with its IP address. This is done by the DNS server. DNS server is a computer, registered with the network which keeps the data of all the websites and corresponding IP addresses. So, blocking the IP address in DNS server will revoke the access of that website.

* In a shared server, same IP address is shared by more than one website. But the large and popular sites like Facebook, Orkut etc. have their own unique IP’s.
Here the tricks play. The Facebook is blocked in your school, office or college because the administrator has blocked that site from the DNS server.

How to open Facebook when it is blocked in office or school

To get on Facebook when it is blocked, you can use another DNS server like OpenDNS servers or Google Public DNS servers.

Access or Login Facebook using Google Public/Open servers
If you are using Windows then go to Control Panel > Network and Internet Connections > Network Connections and right-click on the connection status icon which you are using to access internet. Now choose “Properties” and then “Internet Protocol(TCP/IP)”. Put any one of the following values in the DNS server address

OpenDNS server address:
208.67.222.222
208.67.220.220

Google DNS server address:
8.8.8.8
8.8.4.4
 

Make sure that your institution or office is not using the DNS server which you going to use. Once you change the DNS server, you can get into Facebook, Orkut or any other websites you want. If you know any other way to open Facebook when it is blocked, share with us.
  
Related: Access Facebook from Windows start menu.

More Tips on accessing Facebook if blocked

Most of the schools, colleges or offices keep Facebook blocked so that the students or employees can not open Facebook.com from there. That is why we receive many emails asking how to open Facebook when blocked.
Open Facebook using IP address
Some time, the computer admin edits hosts file to block Facebook in it. He adds the website domain name to the block list in that file. In that case, you can get access to Facebook by the IP address instead of the domain address. Putting IP address in your browser directly, will bypass the barrier from the host file. You can get the IP address by pinging Facebook.com from your computer. To do so, Press Win + R key. It opens the Run command box. Put the following command and hit Enter.

ping facebook.com -t

This will open a command prompt and it will show the IP address of Facebook.com.
Often, chances are that the command prompt is disabled for the current user. In such situation, get the Facebook address here. Once you go to that website, just type facebook.com at where they ask to put it and click on Get IP.
Once you get the IP address, put that in your browser address bar and hit Enter. The Facebook should open.
Use Shortened URLs to access Blocked Facebook
In many situation, the Facebook site URL may be banned for you. In such a case, you can use a shortened URL to bypass the ban. You can use some URL shortening services like goo.gl or bit.ly.

Use Proxy Websites to open Facebook when it is blocked

Proxy websites can be used to open blocked URLs in your computer. But generally, these websites are also blocked in school, colleges or office. Therefore this tricks may not sound much. But you can try to find out unblocked some proxy sites.

Get into Facebook via Secure Web Proxy
Using Secure Web Proxy sites is the easiest way to access Facebook if blocked in your school, college, office or any organization. One of such working website is http://www.securitales.com. The best side of this website is that it won’t ask you to install any application in your computer. It also supports the Facebook chat, photo uploading etc. The website is totally secured for you as it uses the HTTPS protocol. Though it lets you to use their service only 10 minutes for a free trial, you can give this a try as it does not charge too much.

Use Opera Mini browser to access blocked Facebook

If nothing of the above works for you, try the Opera Mini browser to open the Facebook through its mobile version. Simply, go to the Opera mini demo link in your browser and try the mobile version of Facebook. The address for the Facebook mobile version is http://m.facebook.com.
The above methods are enough to access Facebook if blocked. You can also log into your Facebook account thereby.
Are you still facing problems with opening Facebook? You can stay connected with Facebook from your email account.

Access Facebook from your email account

Facebook allows you to choose which updates do you want to get as notification in your email account. Once you set your Facebook account to receive notifications in your email account, you can then check the activities of your Facebook account when blocked at school. Log-in to your Facebook account and go to Account > Account Settings.
In the Notification tab, you can manage your notifications preferences. Once you setup, they will be sent to your email id. Whenever you get that message in your inbox, just open it, click on the link which indicates the option to reply the message. You are done!

Access Facebook using VPN

The best solution to Open Facebook when blocked by your network administrator or ISP is using a VPN. By using a VPN, you can get on many websites which are blocked. I have researched on this and found IPVanish as the best VPN solution. Give it a try to access Facebook from anywhere you wish.
Do you have any other idea to access or open Facebook when blocked? Do share with us.

Note: This tutorial was written depending on various experiments and implementations. Some time the methods may not work for you.
Read More...

Check out Appbrain to Install Apps Directly Onto Your Android Phone

Leave a Comment
Hovering around the Android web market, a huge number of applications come across you as web-interfaces. In the previous week, Androlib suggested that more than 100,000 apps are present in the android web scenario, which Google contradicts as 70,000 only. Now the era has arrived to install Apps directly onto your phone from your desktop browser. Instead of scrolling through the massive number of apps and cruising your selections, just use the Appbrain. The relative simplicity about the operation of this Appbrain relatively reduces the tenacity of Android Phone owners.

Most users have stopped scrolling for default Market Apps.


They either browse through Appbrain or install it  directly from Appbrain website. Lets have a look about the guidelines of Appbrain.

1. Sign up

This is the preliminary step to check out for Appbrain. Just click here to join Appbrain and discover a wide range of Android apps.


Your Google user name and password tabs are required fields to sign up. Your Google account  is conjugated with Appbrain. Hence this step is to be followed.


A few more things need to be configured immediately like your User name and Date of Birth. The following diagram illustrates more of the fact.

2. Install App

Next procedural step includes the installation of  Appbrain App market onto your Android phone.

3. Usage of App

Once the installation of App has been completed successfully, launch Appbrain and  navigate your cursor to “Manage my apps“.


All your installed applications will automatically be loaded onto your phone.


Log-in with your Google Account before sync-ing apps to Appbrain Server.
Navigate and tap on “Sign in” window to launch your personal web browser.


It is to be observed that your apps will consequently be linked to the Appbrain main server.


The task is completed when the “Synchronizing Apps with Appbrain” has been completed. Some apps that requires specific changes or updates pops up in the “Pending changes” tab.


According to your choice, you can add the list of pending apps to your phone by updating them or making changes wherever necessary. You  can do this by selecting the “Perform installs” category. You will be prompted with options either to uninstall an app, to skip updates or install the specified app.

Note: You must always select  “Sync with Appbrain” whenever this application is launched. This automatically enables you yo sync the local apps to the Appbrain Main Server.

4. Appbrain web Interface

Strength of the Appbrain is determined by the easy accessibility of apps spread throughout the Android market. from the Appbrain homepage, you can either prefer to view the Apps installed on your phone by selecting “My Apps” or cruise down your way among  other apps by clicking  
browse” option.

The “browse” option shows you your list of preferred apps hovering round the Android market. Somewhat it will appear as this:

You can select your own personal favorite app an select them by tapping on the “Install ” tab. The picture demonstrates you more:


To finish with the installation, launch Appbrain App market on your phone and cruise to “Manage my apps“. Lastly be sure enough to press the “Sync with Appbrain” to ensure everything is in order.

5. Fast Web Install

Appfire has recently launched Fast Web Install to minimize time consuming  time consuming effects. The manual process of installation on phone after opening website requires specific time. Fast Web Install helps you up to speed up the process of scrolling through new apps recently updated in the Android market.

Just click  here to install the following application following the instruction prompts. Your significant customized settings will be auto-activated and henceforth you will be prompted  to speeding up browsing apps. All you need is to select the installation. However this might prove to be a bit risky since you are left completely uninformed about the permission settings.


However, “Sync with Appbrain” is utmost necessary after the completion of auto-installation process as described earlier. It helps to sync up the latest modifications or changes that have been encountered, to the Appbrain web interface.

So, here you are,on the run. Avail the convenience of Appbrain on your Android Phone !!
Read More...

Protect Windows XP by Locking with Your USB Drive

Leave a Comment
It is a very general problem faced by the general mass when our PC, which is supposed to be personal, is used many other people. It happens many a time that neither we can oppose them nor we can accept the scenario. For all those people, we come up with a nice and interesting trick. From now on you can protect your Windows XP by locking it with a USB drive.
Already we’ve written another process of locking PC using USB Flash Drive by Predator. Check it out.

How does this trick work?

Whenever we switch on the Computer, the booting process of our PC gets started. During this process the computer searches for the BOOT DEVICE in the BIOS. Usually the hard disk drive is the default primary boot device. The instant when our computer is successful in its search, it looks for a specific file named boot.ini and this is the file which contains all information regarding booting of the computer. Now the user’s job is to somehow remove or rename this file and copy it into your USB drive. Once the job is done your USB drive is capable to boot your PC.

Tip: Protect Confidential Files Folders Locking By Folder Guard

Starting with the magic.

Part I: Configuring your operating system (Windows XP):
Just go on performing the tasks as mentioned below
1.First of all, open Windows explorer(WIN key+E) and then go to the drive where Windows XP is installed. Then click on Tools>Folder Options.

Then go to the tab View.

2. Mark the option “Show hidden files and folders”, and unmark the options “Hide extensions for known file types” and “Hide protected operating system files (Recommended)”, if not done earlier. Once done click Apply>OK.

3. The moment you complete step 2, you will find the files boot.ini” , “NTDETECT.COM” , “ntldr” in the drive where your operating system is installed.

4. Now copy these files into a recently formatted, clean USB drive and after completion of the process remove the USB drive from your computer.
5. For the time being, jump to Part II and return here after completion of Part II.

6. The next job is to rename the file boot.ini as boot.ini.bak , so as to create an ensured copy of the file boot.ini which may be of some use later on.

7. Your USB drive is ready. Just go for a TEST DRIVE: (i,e PART III)


Part II : Changing the priority of the boot device in the bios.
Restart your computer and the moment your machine starts press the key for BIOS settings , (It may be F8, F10 or F2 according to various PC’s. Users are requested to check up the hardware manual for confirmation)
Keeping the above caution in mind perform the following steps:

1. First of all, got to the BOOT MENU in order to change the priority of the boot device.


2. Change the priority of your boot device so that first boot device is your USB disk and second boot device is your Hard Disk Drive (HDD).


3. Now save the changes in “Boot Menu” by pressing F10 ( in most cases) and exit BIOS settings.

4. Your USB drive is now almost ready for operation and as told earlier return to Part I (step 6).


Part III : The test drive

Now all the hard work has been done and its time to reap results. To get your much desired result here is how you go:

1. Restart your computer without inserting the USB drive. If you have followed the instructions carefully and performed perfectly your PC will give you a boot error. Don’t get tensed, it signifies that the file boot.ini has been properly renamed.

2. Now insert your USB drive and restart your PC again. This time your computer will boot perfectly as usual. This means that the file inside the drive is working perfectly and your first boot device has been selected as the USB disk.
Well, that completes the entire job. Now your computer cannot be started without the USB drive and this drive is only with you. So none other than you can operate your PC.

How to unlock your Windows XP again?

Hope, now you have learnt how to lock your Windows XP by a USB Drive but we also need to unlock it once the requirement is over. For that, boot your PC using the USB drive and then go to windows installation and rename back the file from “boot.ini.bak” to “boot.ini” . Changing the boot priority from BIOS settings is no more required. After completion. take out your USB drive and restart your PC without inserting the USB drive.
BIOS being a very important part of a computer, be very careful during this operation. If required, ask some other person to handle this part whois accustomed with working in BIOS settings. For any query, drop your words in the comment section.
Read More...